
Getting Started with Rails
위 튜토리얼을 따라 학습하며 작성한 글입니다.
개요
앞서 route 를 설정해 사용자의 요청을 적절한 controller 및 action 으로 전달하는 법을 배웠다.
사용자의 요청을 처리할 controller 와 action 을 작성하는 방법을 공부한다.
DB 기초 포스팅과 Route 포스팅의 내용을 알고 있어야한다.
controller 생성
1
$ bin/rails generate controller Products index --skip-routes
index 액션을 포함해 Products 에 대한 controller 를 생성한다. ProductsController 라고 부른다.
이전 게시글에서 route 를 먼저 만들었으므로 skip-routes 옵션을 사용한다.
1
2
3
4
5
6
7
8
9
      create  app/controllers/products_controller.rb
      invoke  erb
      create    app/views/products
      create    app/views/products/index.html.erb
      invoke  test_unit
      create    test/controllers/products_controller_test.rb
      invoke  helper
      create    app/helpers/products_helper.rb
      invoke    test_unit
출력 결과를 보면 4 개의 파일이 생긴다.
- products_controller.rb
ProductsController 파일 - index.html.erb
ProductsController 의 index 액션에 대한 view 파일 - products_controller_test.rb
ProductsController 의 test 파일 - helper.rb
view 에서 로직을 추출하는 helper 파일
erb 파일은 Embedded Ruby 파일을 의미한다. 앞서 Ruby + HTML 파일이라고 소개했던게 바로 erb 다.
products_controller.rb
1
2
3
4
class ProductsController < ApplicationController
  def index
  end
end
파일이 생성된 경로로 들어가 products_controller 파일을 열어보자.
index 메서드가 있다. rails 에선 action 이라고 부른다. rails 관점에서 접근할 때는 index action 이라고 말하겠다.
index 액션은 index.html.erb 를 렌더링한다.
1
2
3
<h1>Products#index</h1>
<p>Find me in app/views/products/index.html.erb</p>
Products 의 index.html.erb 파일을 살펴보면 위와같다.
직접 접속해서 위 코드가 출력되는지 확인해보자.
request 요청 해보기
1
2
3
4
$ bin/rails server

* Listening on http://127.0.0.1:3000
* Listening on http://[::1]:3000
bin/rails server 명령어로 서버를 실행하자.
콘솔에 접속할 수 있는 주소가 출력될 것이다. 기본 세팅이라면 http://localhost:3000 이 나올것이다.
rails 웰컴 페이지가 나올텐데 우리가 확인할 내용은 http://localhost:3000/products 이다.
그럼 index.html.erb 파일에서 보았던 내용이 그대로 있다.
이유가 뭘까? 바로 이전 포스팅에서 config/routes.rb 파일에 다음과 같이 설정했기 때문이다.
1
2
3
4
get "/products", to: "products#index"

# 또는
resources :products
따라서 /products 요청이 products controller 의 index 액션으로 전달되고 app/view/products/index.html.erb 가 렌더링되서 출력된 것이다.
만약 웰컴 페이지 다시말해 루트 경로가 표시되게 하고싶다면 다음과 같이 작성하면 된다.
1
root "products#index"
한 줄 추가하고 http://localhost:3000 으로 접속해보자. 기존의 웰컴 페이지가 아니라 app/view/products/index.html.erb 가 렌더링되어 출력될 것이다.
instance variables
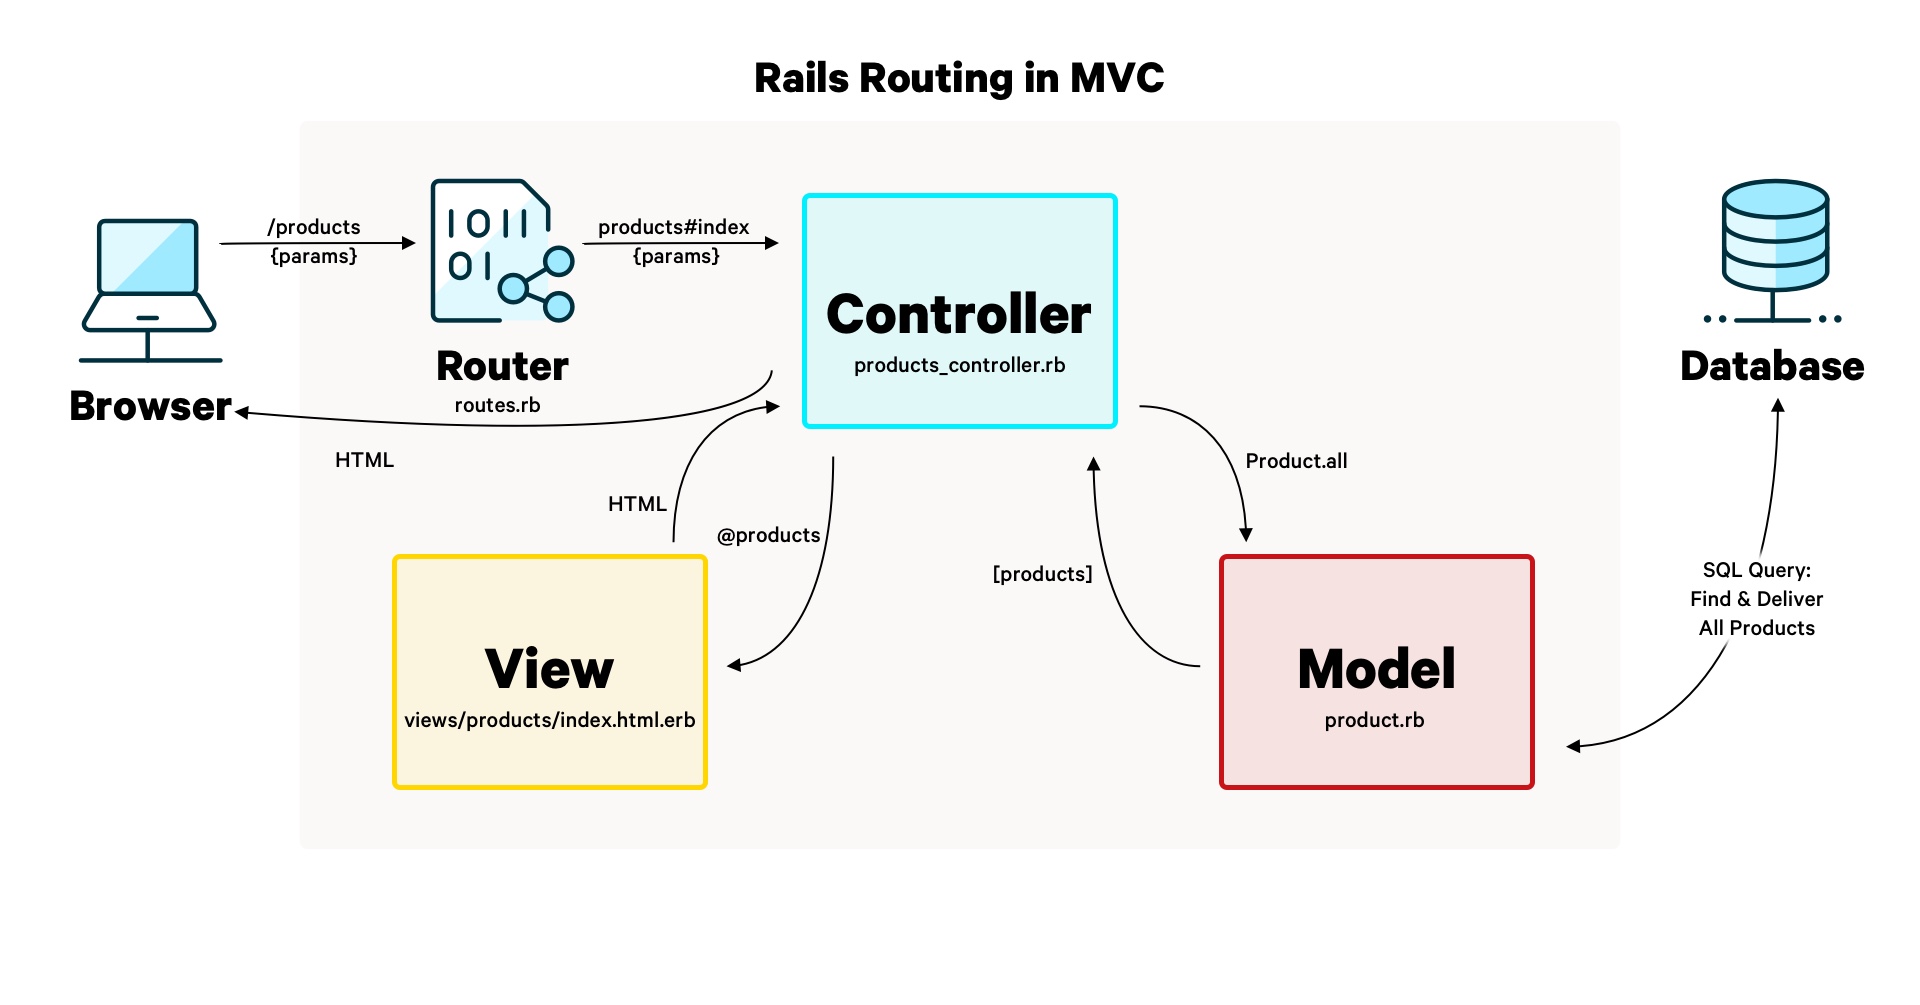
이번엔 DB 의 Products 테이블의 모든 record 를 가져와 화면에 출력해볼것이다.
사진을 보면 controller 가 view 에게 @products 라는 instance 변수를 전달하는 것을 확인할 수 있다.
instance 변수란?
java 의 멤버 변수와 비슷한 개념이다.
인스턴스 내에서 사용할 수 있다는 점이 동일하고, 메서드에서 선언할 수 있다는 차이점이 있다.
예를 들어
1
2
3
4
5
6
7
8
9
10
class MyClass {
    int num = 10;
    void methodA() {
        System.out.println(num);
        // 여기서 멤버 변수 선언 불가능
    }
    void methodB() {
        num++;
    }
}
이렇게 java 의 멤버 변수는 객체 내에서 접근할 수 있다.
하지만 메서드에서 멤버 변수를 선언할 수는 없다.
1
2
3
4
5
6
7
8
9
class MyClass
    def methodA()
        @num = 10
    end

    def methodB()
        puts @num
    end
end
Ruby 는 인스턴스 변수를 메서드 내에서 선언할 수 있다.
인스턴스 변수는 앞에 @ 를 붙인다.
인스턴스 변수는 인스턴스 내에서 접근할 수 있다.
쉽게 설명하자면 java 의 멤버변수를 메서드 내에서 선언할 수 있다고 생각하면 된다.
본론으로 돌아와 ProductsController 에서 Products 테이블의 모든 record 를 조회해 화면에 출력하는 코드를 작성해본다.
1
2
3
4
5
class ProductsController < ApplicationController
  def index
    @products = Product.all
  end
end
@products 인스턴스 변수에 select * from Products 결과를 할당했다.
이렇게 하면 index.html.erb 에서 @products 변수를 사용할 수 있고, 값을 꺼내서 사용할 수 있다.
Spring 에서 model 객체에 값을 넣고 view(thymeleaf) 에서 그대로 꺼내 사용할 수 있는 것과 아주 유사하다.
1
2
3
<h1>Products#index</h1>
<p>Find me in app/views/products/index.html.erb</p>
<%= debug @products %>
출력 결과

| id | name | created_at | updated_at |
| 2 | Pants | 2025-10-12 14:24:11 | 2025-10-12 14:24:11 |
모든 record를 출력해야하는데 저장된 record 가 하나밖에 없는 모습이다.
| <% %> | Ruby 문법 실행 |
| <%= %> | Ruby 문법 실행 후 출력 |
<% %>, <%= %> 를 이용해 HTML 내부에 Ruby 문법을 삽입할 수 있다.
위 코드를 저장하고 새로고침하면 Products 테이블의 모든 레코드가 YAML 형식으로 화면에 출력될 것이다.
음.. 그럼 debug 도 ruby 문법의 일부일까? 아니다.
debug 는 helper 중 하나로 record 를 YAML 형식으로 만들어주기 때문에 디버깅할 때 사용한다.
1
2
3
4
5
6
7
<h1>Products#index</h1>
<p>Find me in app/views/products/index.html.erb</p>
<% @products.each do |product| %>
    <div>
        <%= product.name %>
    </div>
<% end %>
@products 는 여러개의 Product 를 가진 객체니까 위 코드와 같이 반복문을 이용해 출력할 수도 있다.
CRUD 해보기
index 액션을 사용(?)하면서 대충 감을 잡았을 것이다. 더 나아가 CRUD 를 해보자.
show 액션
1
2
3
# config/routes.rb

get "/products/:id", to: "products#show"
show 액션은 특정 record 를 조회할 때 사용한다고 했었다.
앞서 routes.rb 에서 :id 파라미터를 ProductsController 의 show 액션으로 넘기도록 작성했다.
ProductsController 에서 id 를 조회해서 화면에 출력해보자.
1
2
3
4
5
6
7
8
9
class ProductsController < ApplicationController
  def index
    @products = Product.all
  end

  def show
    @product = Product.find(params[:id])
  end
end
넘어온 파라미터는 params[:id] 로 꺼낼 수 있다.
그리고 find 는 하나의 record 만 반환하므로 instance 변수명은 product 가 적절하다.
이렇게 하고 실행해보면 서버는 app/view/products/show.html.erb 를 렌더링하려고 할 것이다.
하지만 이 파일을 만든적이 없다.

따라서 http://localhost:3000/products/2 으로 요청하면 요청에 맞는 템플릿이 없다고 나온다.
1
2
3
<h1><%= @product.name %></h1>

<%= link_to "Back", products_path %>
app/view/products/show.html.erb 파일을 만들고 위 코드를 작성하자.
link_to 는 helper 로 html 로 풀어쓰면 다음과 같다. <a href="<%= products_path %>">Back</a>
파일을 저장하고 실행해보면 잘 되는 것을 확인할 수 있다.

이 튜토리얼은 e-commerce 를 만드는 것이 목표다.
위 사진에 작성된 부연설명처럼 페이지 전환을 하도록 해야한다.
1
2
3
4
5
6
7
<h1>Products#index</h1>
<p>Find me in app/views/products/index.html.erb</p>
<% @products.each do |product| %>
    <div>
        <a href="/products/<%= product.id %>"><%= product.name %></a>
    </div>
<% end %>
Refresh this page in your browser and you’ll see that this works, but we can do better.
이렇게 수정하고 새로고침하면 잘 작동되는 것을 볼 수 있다. but we can better.
Rails 는 path 와 url 을 생성하는 helper 를 제공한다.
1
bin/rails routes
1
2
3
4
5
6
7
8
9
                                  Prefix Verb   URI Pattern                                                                                       Controller#Action
                                products GET    /products(.:format)                                                                               products#index
                                         POST   /products(.:format)                                                                               products#create
                             new_product GET    /products/new(.:format)                                                                           products#new
                            edit_product GET    /products/:id/edit(.:format)                                                                      products#edit
                                 product GET    /products/:id(.:format)                                                                           products#show
                                         PATCH  /products/:id(.:format)                                                                           products#update
                                         PUT    /products/:id(.:format)                                                                           products#update
                                         DELETE /products/:id(.:format)                                                                           products#destroy
bin/rails routes 를 입력하면 위와 같은 결과를 얻을 수 있다.
제일 위의 prefix 는 products 이고 URI Pattern 은 /products(.:format) 임을 확인할 수 있다.
이러한 정보들을 바탕으로 자동으로 products_url 과 products_path 라는 helper 를 만든다.

Routes 의 prefix 와 URI pattern 으로 자동 생성되는 helper 의 규칙을 이해했으면 아까 그 코드를 다시 고쳐보자.
1
2
3
4
5
6
7
<h1>Products</h1>

<% @products.each do |product| %>
    <div>
        <%= link_to product.name, product_path(product.id) %>
    </div>
<% end %>
이렇게 하면 잘 된다. 하지만 tutorial 에선 아래처럼 리팩토링 하라고 한다.
1
2
3
4
5
6
7
<h1>Products</h1>

<% @products.each do |product| %>
    <div>
        <%= link_to product.name, product %>
    </div>
<% end %>
엄… tutorial 이 내게 장난을 친다. product 는 객체인데 왜 이게 작동될까? 심지어 product 를 그냥 화면에 찍어보면 객체라고 나오는데, 어떻게 url 이 동작하는걸까?
chatGPT 가 말하길 url 을 받아야하는데, 없으니까 url 을 product 에서 추론을 한단다. 그럼 /products/:id 가 나올거고 id 가 필요하니 다시 추론을 해서 product.id 를 가져온다고 한다.
음… 뭐 tutorial 이니까 자세한 동작원리보단 이런게 되구나~ 하고 넘어가자.
new 와 create 액션
- new
새 record 를 만드는 form 을 보여주는 동작을 수행 - create
form 을 처리하여 새 record 를 생성
new 와 create 액션을 만들거다.
1
2
3
4
5
6
7
8
9
10
11
12
13
class ProductsController < ApplicationController
  def index
    @products = Product.all
  end

  def show
    @product = Product.find(params[:id])
  end

  def new
    @products = Product.new
  end
end
우선 new 메서드를 작성했다.
/products/new 로 요청을 하면 app/view/products/new.html.erb 를 렌더링 해서 보여주게 된다.
1
2
3
4
5
6
7
8
9
10
11
<%# app/view/products/index.html.erb %>

<h1>Products</h1>

<%= link_to "New Product", new_product_path %>

<% @products.each do |product| %>
    <div>
        <%= link_to product.name, product %>
    </div>
<% end %>
우선 index.html.erb 에 /products/new 를 요청하는 링크를 하나 만들었다.
1
2
3
4
5
6
7
8
9
10
11
12
13
14
<%# app/view/products/new.html.erb %>

<h1>New Product</h1>

<%= form_with model: @product do |form| %>
    <div>
        <%= form.label :name %>
        <%= form.text_field :name %>
    </div>

    <div>
        <%= form.submit %>
    </div>
<% end %>
그 다음 new.html.erb 를 작성해준다.
form_with 은 form 의 작성을 돕는 helper 다.
controller 에서 가져온 product 객체를 form_with 으로 전달한다.
form_with 에서 만든 FormBuilder 객체를 |form| 으로 넘겨준다.
:name 은 symbol 이라고 해서 ruby 문법이다.
1
2
<%= form.label "name" %>
<%= form.text_field "name" %>
예를 들어 erb 코드를 위 처럼 수정 후 html 코드를 열어보면 수정 전과 동일 한 것을 알 수 있다.
여기서는 symbol 이 단순 문자열 역할로 사용되었기 때문에 차이는 없다. symbol 과 문자열의 차이는 ruby 문법을 따로 공부하자.
submit 버튼은 create 액션을 호출하도록 POST /products 로 링크를 자동 설정해준다.
엥 왜 /products/create 가 아닐까요? 라고 생각했다면 config/routes.rb 를 다시 열어보자.
1
post "/products", to: "products#create"
라고 작성했던걸 볼 수 있다.
어우 너무 귀찮은데 그냥 html 로 코딩하고 필요한 값만 @product 에서 빼오고 싶다. 라고 생각한 나..
하지만 form builder(form_with 과 같은 helper) 를 사용해야하는 이유가 두 가지 있다.
- CSRF 방지 토큰을 자동으로 삽입해준다.
- 레일즈 철학: 최선의 방법이 있다고 가정한다. 그리고 그 방법을 장려하도록 디자인(설계)되었으며 - 경우에 따라서 대안들을 배제한다. 를 따라야하기 때문이다.
create 액션
GET /products/new -> new 액션 -> new.html -> POST /products -> create 액션(구현필요)
이제 create 액션을 구현해보자.
1
2
3
4
5
6
7
8
9
10
11
12
13
14
15
class ProductsController < ApplicationController
  def create
    @product = Product.new(product_params)
    if @product.save
      redirect_to @product
    else
      render :new, status: :unprocessable_entity
    end
  end

  private
    def product_params
      params.expect(product: [ :name ])
    end
end
하나씩 차근차근 읽어보자.

product_params 메서드를 정의한다.
params 에는 client 가 보낸 데이터가 저장되어 있다. rails 프레임워크가 자동으로 채워준다.
Spring Framework 를 공부했다면 HttpRequestServlet request 라고 생각하면 된다.
expect 는 ‘기대하다’, ‘예측하다’ 라는 의미로 :name 만 기대하고 나머지는 필터링한다.
만약 client 가 보낸 값이 { name: Pants, email: foo@bar.com } 이라면 { name: Pants } 가 된다.
ruby 는 return 을 생략할 수 있다. 암묵적으로 마지막 줄을 return 이라고 생각한다.
따라서 Product.new( { name: Pants } ) 가 되는 것이다.

@product.save 에 성공하면 해당 제품 상세 페이지로 이동하도록 만드려고한다.
그럼 show 액션을 호출해야한다.
Rails 는 redirect_to 에 ActiveRecord 를 매개변수로 전달할 시 show 액션 경로를 만들어준다.
render 함수에 첫번재 매개변수로 :new 를 주고 두번째 매개변수로 422를 주었다.
@product.save 에 실패하면 new.html.erb 를 렌더링하고 HTTP status code 를 422 로 설정해서 응답해주게 된다.
edit 과 update 액션
- edit
record 를 update 하는 form 을 보여주는 동작을 수행 - update
form 을 처리하여 record update 수행
1
2
3
4
5
6
7
8
9
10
11
12
  def edit
    @product = Product.find(params[:id])
  end

  def update
    @product = Product.find(params[:id])
    if @product.update(product_params)
      redirect_to @product
    else
      render :new, status: :unprocessable_entity
    end
  end
new 와 create 액션의 코드를 이해했다면 이 코드에 대한 별도의 설명이 필요없을것이라 생각한다.
edit.html.erb 를 작성하자.
1
2
3
4
5
6
<%# app/view/products/show.html.erb %>

<h1><%= @product.name %></h1>

<%= link_to "Back", products_path %>
<%= link_to "Edit", edit_product_path(@product) %>
제품 상세 페이지에 Edit 액션을 호출하는 버튼을 추가한다.
1
2
3
4
5
6
7
8
9
10
11
12
13
14
<%# app/view/products/edit.html.erb %>

<h1>Edit Product</h1>

<%= form_with model: @product do |form| %>
    <div>
        <%= form.label :name %>
        <%= form.text_field :name %>
    </div>

    <div>
        <%= form.submit %>
    </div>
<% end %>
edit.html.erb 도 추가한다. new.html.erb 코드와 동일하다.
destroy 액션
1
2
3
4
5
6
7
<%# app/view/products/show.html.erb %>

<h1><%= @product.name %></h1>

<%= link_to "Back", products_path %>
<%= link_to "Edit", edit_product_path(@product) %>
<%= button_to "Delete", @product, method: :delete, data: { turbo_confirm: "Are you sure?" } %>
1
2
3
4
5
  def destroy
    @product = Product.find(params[:id])
    @product.destroy
    redirect_to products_path
  end
show.html 에 destroy 액션에 대한 버튼을 추가한다.
destroy 액션은 간단하므로 설명을 생략한다.
Before Actions
controller 를 보면 중복되는 코드가 하나 있었다.
이 코드를 하나의 메서드로 작성 후 action 이 시작되기 전 수행하도록 만들 수 있다.
이 기능을 Before Actions 라고 한다.


사진을 보면 중복되는 코드는 삭제 후 set_product 라는 메서드에 해당 코드를 넣었다.
그리고 최상단에 before_action :메서드명, only: %i[ 액션명1, 액션명2, ... 수행할 액션명 지정 ] 코드를 작성하여 show, edit, update, delete 액션에 set_product 가 수행되도록 했다.
1
2
3
4
5
6
7
8
9
10
11
12
13
14
15
16
17
18
19
20
21
22
23
24
25
26
27
28
29
30
31
32
33
34
35
36
37
38
39
40
41
42
43
44
45
46
47
48
class ProductsController < ApplicationController
  before_action :set_product, only: %i[ show edit update destroy]
  def index
    @products = Product.all
  end

  def show
  end

  def new
    @product = Product.new
  end

  def create
    @product = Product.new(product_params)
    if @product.save
      redirect_to @product
    else
      render :new, status: :unprocessable_entity
    end
  end

  def edit
  end

  def update
    if @product.update(product_params)
      redirect_to @product
    else
      render :new, status: :unprocessable_entity
    end
  end

  def destroy
    @product.destroy
    redirect_to products_path
  end

  private
    def set_product
      @product = Product.find(params[:id])
    end

    def product_params
      params.expect(product: [ :name ])
    end

end
수정 후 코드.
Extracting Partial

new.html.erb 와 edit.html.erb 의 코드가 똑같았다.
동일한 코드만 따로 작성하여 중복을 줄이는 방법이 있다.
이를 Extracting Partial(부분 추출) 이라고 한다.

1
2
3
4
5
6
7
8
9
10
11
12
<%# app/view/products/_form.html.erb %>

<%= form_with model: @product do |form| %>
    <div>
        <%= form.label :name %>
        <%= form.text_field :name %>
    </div>

    <div>
        <%= form.submit %>
    </div>
<% end %>
1
2
3
4
5
6
<%# app/view/products/new.html.erb %>

<h1>New Product</h1>

<%= render "form", product: @product %>
<%= link_to "Cancle", products_path %>
1
2
3
4
5
6
7
<%# app/view/products/edit.html.erb %>

<h1>Edit Product</h1>


<%= render "form", product: @product %>
<%= link_to "Cancle", @product %>
partial 의 이름은 항상 _ 로 시작해야하므로 파일명이 _form.html.erb 다.
partial 을 사용하면 인스턴스 변수가 아닌 지역변수를 사용할 수 있게된다.
지역변수를 사용할 수 있게 되면서 한 페이지에 partial 이 여러번 사용될 때 변수에 각각 다른 값이 들어갈 수 있게 되는 장점이 생긴다.

그림으로 설명하면 위와 같다.
썸네일을 출력해주는 partial 이 있다고 가정해보자.
@products 를 반복문을 이용해 각각의 @product 를 구하고 그걸 썸네일 partial 로 넘겨준다.
이 때 partail 이 인스턴스 변수로 받게 되면 모든 @product 가 같아져 모두 키위가 출력된다.
당연히 지역변수를 사용하면 문제없이 사과, 바나나, 키위가 출력된다.
partial 을 띄우려면 render helper 를 이용하면 된다.
첫번재 변수는 “form” 을 주면 _form.html.erb 를 찾는다
두번째 변수는 ‘partial의 product 변수’에 @product 값을 전달했다.
코드를 수정하고 실행해보면 잘 되는것을 확인할 수 있다.